 |
| scene.tiff |
This document is a short tutorial on how to add shadows to a scene using RenderDotC. At the time of writing, RenderDotC was up to version 3.1b1. You can find RenderDotC at the DotC Software homepage.
It is assumed in this guide that the reader has a copy of RenderDotC and some experience with writing RIBs. A working knowledge of your system is required and a C compiler will come in very handy later.
Although care has been taken to ensure that all of the information in this guide is correct, no-one can be held liable for any errors or omissions.
|
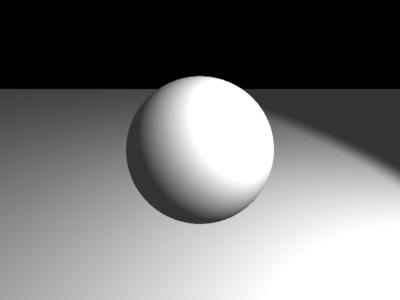
| scene.tiff |
version 3.03
Display "scene.tiff" "file" "rgba"
Format 400 300 1

Projection "perspective" "fov" 45
Translate 0 0 5
Rotate -20 1 0 0

WorldBegin
        LightSource "ambientlight" 0 "intensity" [0.2]
        LightSource "spotlight" 1 "intensity" [75] "from" [5 5 -5] "to" [0 0 0]
                    "coneangle" [0.5]

        Color [1 1 1]
        Surface "matte"
        Sphere 1 -1 1 360

        Patch "bilinear" "P"    [-10 -1 -10
                                  10 -1 -10
                                 -10 -1  10
                                  10 -1  10]

WorldEnd
This is very simple, all we have to do is change the line:
Display "scene.tiff" "file" "rgba"to:
Display "shadow.map" "file" "z"And we will get a shadow map containing Z values. That was the easy part, the hard part is moving the camera into the same position as the light. Pixar have a neat little snippet of code (which can also be found in the RenderMan Companion) called placecam which makes this part a lot easier.
This is a slightly modified version of Pixar's placecam.c:
/*
 * PlaceCamera(): establish a viewpoint, viewing direction and orientation
 *  for a scene. This routine must be called before RiWorldBegin().
 *  position: a point giving the camera position
 *  aim: a point giving the location at which the camera is aimed
 *  roll: an optional rotation of the camera about its direction axis
 *  coneangle: an optional spotlight shader cone angle
 */

#include <math.h>
#include <stdio.h>
#include <stdlib.h>

#define PI 3.1415926535897932

void usage(void)
{
        printf("usage: placecam pos_x pos_y pos_z aim_x aim_y aim_z\n");
        printf(" [coneangle] [roll_angle]\n");
        printf(" Calculate RenderMan transforms needed for camera transform\n");
        printf(" from light position to aim point with the given roll angle.\n");
        exit(1);
}

typedef double RtPoint[3];

void RiRotate(double angle, double x, double y, double z)
{
        if (fabs(angle) > 0.001)
                printf("Rotate %0.2f %0.2f %0.2f %0.2f\n", angle, x, y, z);
}

void RiTranslate(double dx, double dy, double dz)
{
        printf("Translate %0.2f %0.2f %0.2f\n", dx, dy, dz);
}

/*
 * AimZ(): rotate the world so the direction vector points in
 *  positive z by rotating about the y axis, then x. The cosine
 *  of each rotation is given by components of the normalized
 *  direction vector. Before the y rotation the direction vector
 *  might be in negative z, but not afterward.
 */
void AimZ(RtPoint direction)
{
        double xzlen, yzlen, yrot, xrot;

        if (direction[0]==0 && direction[1]==0 && direction[2]==0)
                return;

        /*
         * The initial rotation about the y axis is given by the projection of
         * the direction vector onto the x,z plane: the x and z components
         * of the direction.
         */
         xzlen = sqrt(direction[0]*direction[0]+direction[2]*direction[2]);
         if (xzlen == 0)
                 yrot = (direction[1] < 0) ? 180 : 0;
         else
                 yrot = 180*acos(direction[2]/xzlen)/PI;

        /*
         * The second rotation, about the x axis, is given by the projection on
         * the y,z plane of the y-rotated direction vector: the original y
         * component, and the rotated x,z vector from above.
         */
         yzlen = sqrt(direction[1]*direction[1]+xzlen*xzlen);
         xrot = 180*acos(xzlen/yzlen)/PI; /* yzlen should never be 0 */

         if (direction[1] > 0)
                 RiRotate(xrot, 1.0, 0.0, 0.0);
         else
                 RiRotate(-xrot, 1.0, 0.0, 0.0);

        /* The last rotation declared gets performed first */
        if (direction[0] > 0)
                RiRotate(-yrot, 0.0, 1.0, 0.0);
        else
                RiRotate(yrot, 0.0, 1.0, 0.0);
}

void PlaceCamera(RtPoint position, RtPoint direction, float roll)
{
        RiRotate(-roll, 0.0, 0.0, 1.0);
        AimZ(direction);
        RiTranslate(-position[0], -position[1], -position[2]);
}

int main(int argc, char *argv[])
{
        RtPoint pos, aim, dir;
        double roll;
        double coneangle, fov;

        if (argc < 7)
                usage();

        pos[0] = atof(argv[1]);
        pos[1] = atof(argv[2]);
        pos[2] = atof(argv[3]);
        aim[0] = atof(argv[4]);
        aim[1] = atof(argv[5]);
        aim[2] = atof(argv[6]);

        if (argc > 7) coneangle = atof(argv[7]);
                else coneangle = 0.0;

        if (argc > 8) roll = atof(argv[8]);
                else roll = 0.0;

        printf("position: %0.2f, %0.2f, %0.2f\n", pos[0], pos[1], pos[2]);
        printf("aim: %0.2f, %0.2f, %0.2f\n", aim[0], aim[1], aim[2]);
        printf("coneangle: %0.4f\n", coneangle);
        printf("roll: %0.2f\n\n", roll);

        if (coneangle != 0.0) {
                fov = coneangle * 360.0 / PI;
                printf("Projection \"perspective\" \"fov\" [%0.2f]\n", fov);
        }

        dir[0] = aim[0] - pos[0];
        dir[1] = aim[1] - pos[1];
        dir[2] = aim[2] - pos[2];

        PlaceCamera(pos, dir, roll);
        return 0;
}
LightSource "spotlight" 1 "intensity" [75] "from" [5 5 -5] "to" [0 0 0] "coneangle" [0.5]To get the camera transform code we'll need to run placecam. Just running it without any parameters will produce this:
usage: placecam pos_x pos_y pos_z aim_x aim_y aim_zThis means that to get the transform code we need, all we have to do is run:
[coneangle] [roll_angle]
Calculate RenderMan transforms needed for camera transform
from light position to aim point with the given roll angle.
placecam 5 5 -5 0 0 0 0.5 1Can you see where the values came from?
Remember that all of this is assuming that we are using a spot light.
- The first three define the camera's position.
- The next three define the point it's aiming at.
- The seventh number defines the angle of the light's cone.
- The last number defines the roll angle. This is seldom used because you usually don't need to roll (rotate) a light.
placecam will now give us a little chunk of RIB code which we need to put into shadow.rib. This is what placecam returns from the above call:
We need those last four lines which form the necessary RIB code to place the camera in the same position as the light. We also need to change the output resolution - it's usually a good idea to define a square image with dimensions which are powers of 2. 256x256 and 512x512 are good choices. Finally, we need to kick out any objects which do not cast shadows or which don't really affect the scene along with all surface and color statements and lights.position: 5.00, 5.00, -5.00 aim: 0.00, 0.00, 0.00 coneangle: 0.5000 roll: 0.00 Projection "perspective" "fov" [57.30] Rotate -35.26 1.00 0.00 0.00 Rotate 45.00 0.00 1.00 0.00 Translate -5.00 -5.00 5.00
Here is what shadow.rib should look like:
version 3.03

# Output Z data only
Display "shadow.map" "shadow" "z"

# Shadow is bigger than output image, this should give good resolution
Format 512 512 1

# Clip it for better quality
Clipping 5 10

# No antialiasing
ShadingRate 1
PixelSamples 1 1
PixelFilter "box" 1 1

# Placecam camera transform
Projection "perspective" "fov" [57.30]
Rotate -35.26 1.00 0.00 0.00
Rotate 45.00 0.00 1.00 0.00
Translate -5.00 -5.00 5.00

WorldBegin

        # Don't need any light declarations
        # LightSource "ambientlight" 0 "intensity" [0.2]

        # The sphere casts a shadow
        Surface "null"
        Sphere 1 -1 1 360

        # The ground doesn't. Kill it.
        # Patch "bilinear" "P" [-10 -1 -10...

WorldEnd
Secondly, there is clipping. You don't have to worry too much about clipping with RenderDotC but if you get some unexpected results from your shadowmap you should look at your clipping. Clipping is easy to use, just add a line like this into your RIB code:
Clipping <nearest point> <farthest point>Finally, the angle of the projection in your shadow map, since it is directly connected with the size of the projected objectsi in the final renderd map, the projection angle contributes to shadow map quality.
In the example shadow map, we use the following projection:
Projection "perspective" "fov" [57.30]If you render this to the framebuffer (yes, you can render Z-buffer data to the screen - it will look strange but you'll still be able to tell what's going on) and fiddle with the projection angle you will find that you can turn the angle down to 20 and you will get a much nicer shadow map. The projection angle in the shadow map does not need to match the light's cone angle. As long as the shadow map can see all of the objects which cast shadows everything will be fine.
LightSource "spotlight" 1 "intensity" [75] "from" [5 5 -5] "to" [0 0 0] "coneangle" [0.5]to:
LightSource "shadowspot" 1 "intensity" [75] "from" [5 5 -5] "to" [0 0 0] "coneangle" [0.5] "shadowname" ["shadow.map"] "width" [3]So you'll be left with a final RIB which looks like this:
version 3.03
Display "final.tiff" "file" "rgba"
Format 400 300 1

Projection "perspective" "fov" 45
Translate 0 0 5
Rotate -20 1 0 0

WorldBegin

        LightSource "ambientlight" 0 "intensity" [0.2]
        LightSource "shadowspot" 1 "intensity" [75] "from" [5 5 -5] "to" [0 0 0]
                    "coneangle" [0.5] "shadowname" ["shadow.map"] "width" [3]

        Color [1 1 1]
        Surface "matte"
        Sphere 1 -1 1 360

        Patch "bilinear" "P"    [-10 -1 -10
                                  10 -1 -10
                                 -10 -1  10
                                  10 -1  10]

WorldEnd
When you render the final you will have a much nicer scene. Shadows can add a lot of depth, realism and believability to a scene - even a simple one like this:
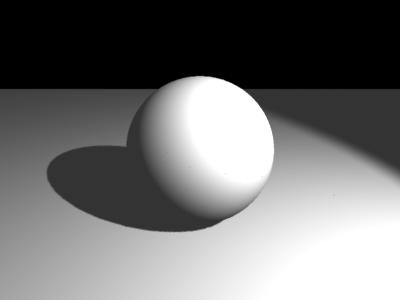 |
| final.tiff |